How To Build SkyRoadie at Home
How To Build SkyRoadie at Home


These are the templates and plans for the final
layout of the SKYROADIE which I built; photos below detail more of the
build; the cutting mat behind the vertical fuselage structure templates
are a 1" grid; the graph paper of the plan sheet below is also a 1"
grid.

On my 'stand-off-scale' build of the SKYROADIE, I'm using Bluecor PP -
(I had stashed some away a couple of years ago while I could still get
it locally.) I'm not so concerned with keeping a strictly scale profile,
or about building a lightweight floater... I'm working more from a
'standoff scale' mindset, while building an aircraft which will handle
high speeds without any problems of airframe twist or control surface
flutter.
The 29" span wing is built with a thin KFm2 variant airfoil, with
the leading edge heavily carved, sanded, then heat-formed into an
airfoil shape. It has a cleanly shaped leading edge which should allow
this aicraft to fly without being pitch-sensitive (as many
flat-plate-winged aircraft can be), and the drag should be minimal. The
upper layer of the wing is also thinned as it approaches the wing tips,
to further minimize drag.
I decided to build a 2" deep under-fuselage, and tripled the
thickness on the forward lower fuselage area where I'll carry the 3S
1050 Rhino battery pack and mount the ESC; this will keep most of the
weight low & centered, for good neutral stability. I also lowered
the profile of the forward upper section of the fuselage to avoid having
too much vertical surface area forward of the CG, and slightly
increased the vertical stabilizer's area to help stabilize the added
under-fuselage's extra area. This SKYROADIE build also lost the wing's
leading edge 'shoulders' where the air intake ducts for the jet engine
are found on the origional aircraft; I opted for a clean flowing profile
in this area of the wing's leading edge.
I also increased the height of the under-fuselage rear end just
under the tail & motor, to protect the 7" prop on landings-
especially useful in the rough landing conditions out on the native
short-grass prairie where I fly most of the time. (These design
variations are in the spirit of 'stand-off scale', with just a bit of
'artistic license' exercised, while also trying to end up with some
clean flowing lines to this SKYROADIE variant.)
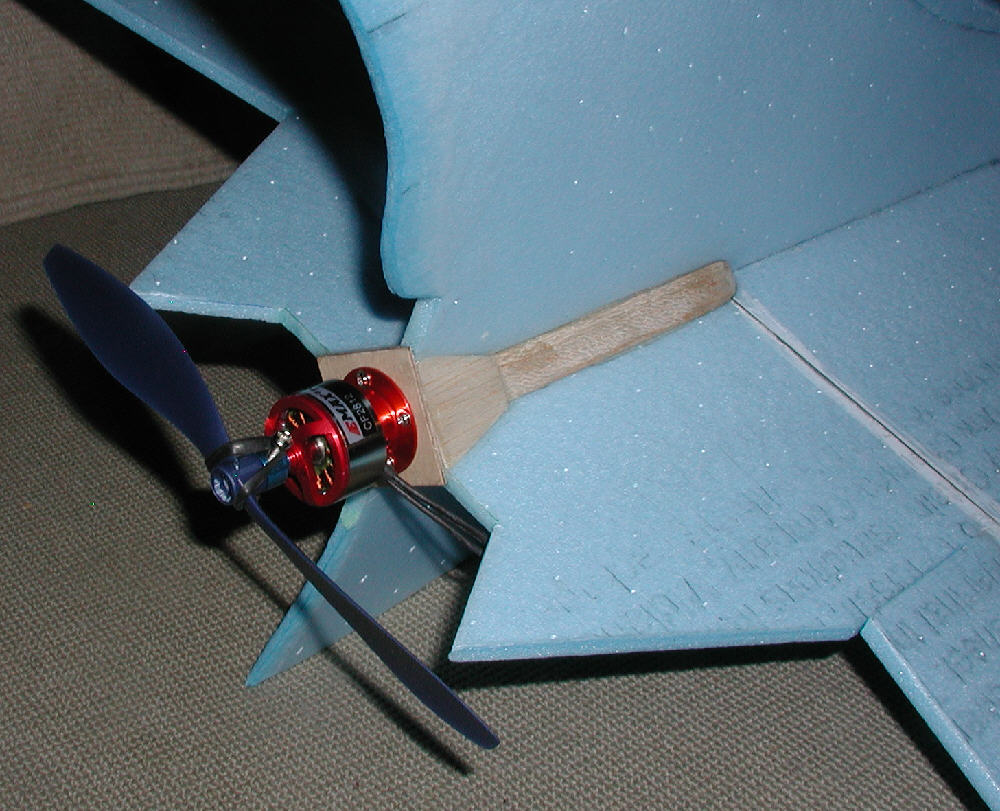
The CF2812 1600 Kv motor will be turning a 7x6 prop for first
flights. It's mounted on a 1/16" birch ply bulkhead, with a couple of
firm 1/2" balsa triangles tieing it in forward to the rear wing
stiffener set, and sheet balsa farings fit to clean up the airflow.
Here's a preview of my progress so far- I'm ready to install the
servos and linkage next, then add the extended motor wires forward to
the ESC's mounting position. The airframe structure, with the motor
mount completed, weighs 5-1/4 ounces.
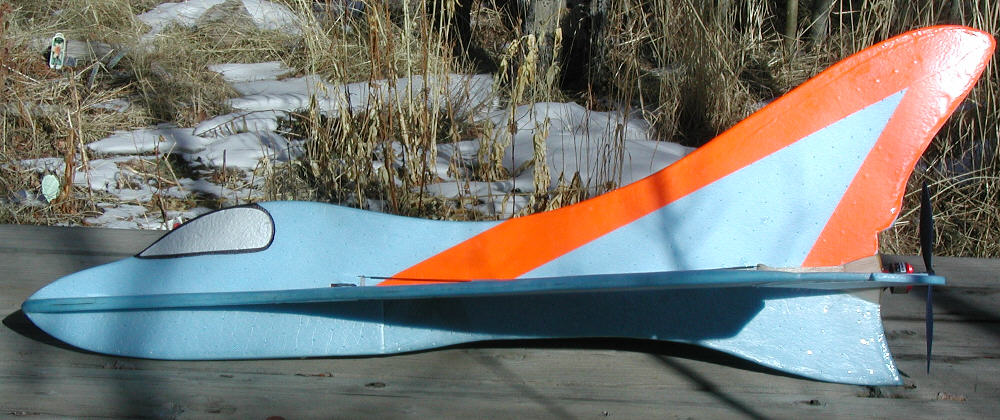
I'll likely paint this SKYROADIE in non-scale colors- Bright yellow
above with hot orange and black trim, and mostly black below with some
bright trim.
Flying weight on this build is estimated to finalize at about 13
ounces before paint or trim is added; the final flying weight after all
of the Fluorescent orange trim tape was applied is at 13.75 ounces.
I do love the lines of the SKYROADIE- it looks fast just sitting still!
Wingspan: 29"
Wing Area: ~348 square Inches = 2.4 Square Feet
Flying Weight 14 Ounces after all Fluorescent orange and dark blue trim tape was applied
Wing Loading : 5.83 Ounces per square foot
Overall Length: ~36"
Materials Of Construction: Bluecor PP with Balsa reinforcing of ply motor mount; Wing uses a thin KFm2 variant airfoil
1mm solid CF rods used in opposing pairs as structural stiffeners (.086 ounces for 2 meters of length used)
1.5mm CF rods used for elevator and rudder control rods
Motor Used: E-Max CF2812 1600Kv Brushless Outrunner
ESC : Turnigy 20 Amp 'Super Simple' programmable
Battery: 3S 1050 mAH Rhino LiPoly
Propeller: 7x6
Peak Static Current Draw 15.2 Amps = ~170 watts input power
Radio Receiver: Corona 4 Channel Single Conversion, with modified base loaded short antenna
Transmitter Used: Airtronics RD8000
Servos: two HXT900 9 gram servos for Elevons


***Note***This method is done by Mr. Bruce Stenulson's and pictures has been taken himself personally. Click here to visit his personal page for more information.